Azure Devops Pipelines Configuration
Here we learn how to create and configure azure pipeline that can release build to Azure App Service deployment slot. You need to have a subscribed access on Azure Portal to see the last impact of deployment.
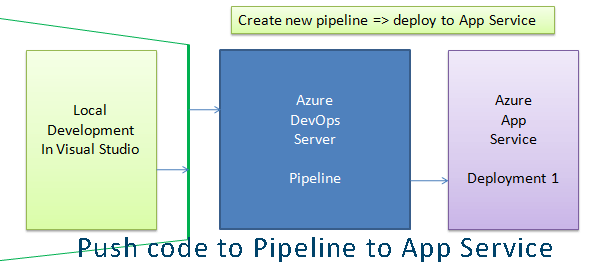
I am assuming you are already familiar with how to push code base from your local machine visual studio to azure devops server, if not please read my earlier post about pushing code dev machine to azure devops.
Now in your devops project, create a new pipeline by clicking Pipelines=> new pipeline, and the following screen will appear.
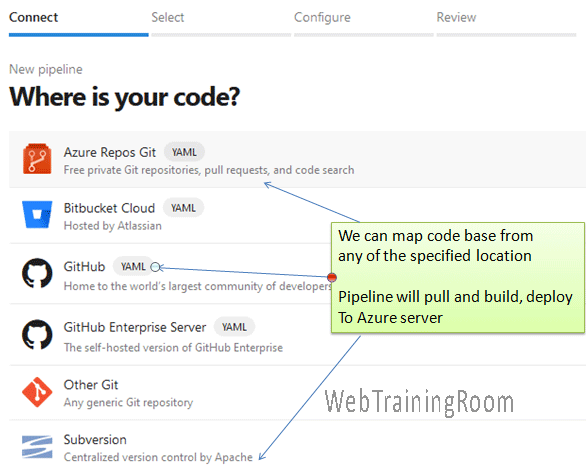
Devops supports pipeline from different source, as you can see in above picture, the tool allow you to fetch codebase from location like Azure Repos, GitHub, Sebversion etc.
We can create multiple pipelines and manage them, we can edit, delete, rename unless execution is complete.

Now in this tutorial we will learn how to use devops repos codebase in pipeline configuration to push finally to azure portal app service deployment slot.
Once you create/edit pipeline, then one file with name azure-pipelines.yml will be created, which will have following information.
trigger:
- master
pool:
  vmImage: 'windows-latest'
variables:
  solution: '**/*.sln'
  buildPlatform: 'Any CPU'
  buildConfiguration: 'Release'
steps:
- task: NuGetToolInstaller@1
- task: NuGetCommand@2
  inputs:
    restoreSolution: '$(solution)'
- task: VSBuild@1
  inputs:
    solution: '$(solution)'
    msbuildArgs: '/p:DeployOnBuild=true /p:WebPublishMethod=Package /p:PackageAsSingleFile=true /p:SkipInvalidConfigurations=true /p:DesktopBuildPackageLocation="$(build.artifactStagingDirectory)\WebApp.zip" /p:DeployIisAppPath="Default Web Site"'
    platform: '$(buildPlatform)'
    configuration: '$(buildConfiguration)'
- task: VSTest@2
  inputs:
    platform: '$(buildPlatform)'
    configuration: '$(buildConfiguration)'
The above files is automatically generated by devops tools, we still can add/modify content if required.
After creating the pipeline we should save it by clicking save button on top right corner, there is also a run button, but configuration is not yet complete, so we should not run the pipeline now.
Now we have to create release pipeline.
Release pipeline will build the defined solution and push the updated content to azure portal app service deployment slot.
While creating this release pipeline, side by side you can open the azure portal, create app service deployment plan, if not already created, this also will help to get the azure credential into to DevOps server to configure it automatically.
From menu on you left side, go to Pipelines => Release => New Pipeline.
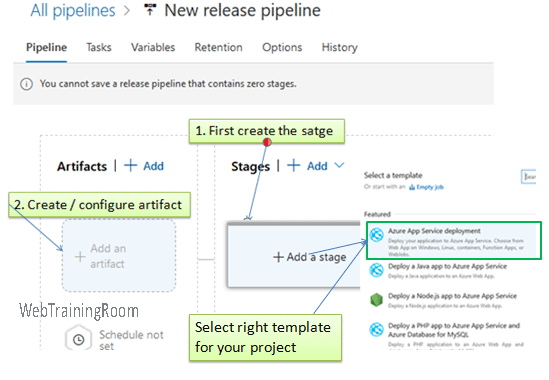
First click on “Add a Stage”, choose the right template where you want to deploy,( for example, i want to deploy my asp.net core web application to Azure App Service deployment slot) so i choose the first template (as you can see selected in above picture).
After setting the stage template, you need to connect the deployment slot in azure portal by selecting your subscription key.
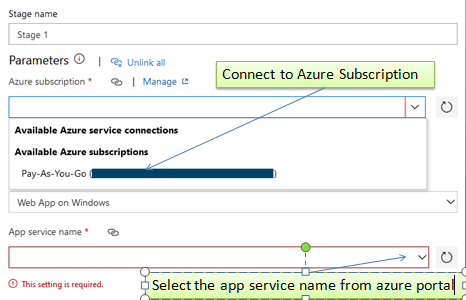
Once you set the valid azure subscription key, it will list down all app service available on your azure portal, you can set the right app service in next dropdown list (as displayed in above picture).
Now we need to add an artifact, that help setting continuous deployment, that means whenever some new code changes detected in repos, it will automatically execute the build process.


