Identity configuration in Asp.net core
What is Identity in ASP.NET Core?
Identity is toolkit often termed as authentication as service, an API that provides set of standard functionalities for authentication and authorization features, we can create new user account and provide login mechanism with different user roles and user profile.
If you are new developer, i recommend you to go through the process of how basic authentication process implemented in web application, which will really help you to understand concept about app authentication implementation.

How to configure identity service in .net core
Here we learn how to implement identity service in asp.net core application, which will include installing all required assembly, configuring startup file, creating database tables using entity framework utility, and finally creating form for new user and login user.
Firstly, we need to install following assemblies in nuget package manager, do open your nuget package manager by right clicking on project solution explorer, then search each assembly one by one and install them.
Microsoft.AspNetCore.Identity
Microsoft.AspNetCore.Identity.EntityFrameworkCore
Microsoft.EntityFrameworkCore.Design
Microsoft.EntityFrameworkCore.SqlServer
Now we create two classes “AppUser” and “AppIdentityDbContext”, here in example I have created both classes in one file, but you can create two different files
Notice, the AppUser class is inherited from IdentityUser AppUser:IdentityUser and the
AppIdentityDbContext class is inherited from IdentityDbContext class AppIdentityDbContext : IdentityDbContext<AppUser> with "AppUser" class type.
Notice, here the DbContext AppIdentityDbContext : IdentityDbContext<AppUser> file is different than how we define dbcontext class in entity framework core,
this class takes AppUser class as parameter and internally register all mapping properties.
namespace WTRIdentityCore.Models
{
    public class AppUser:IdentityUser
    {
    }
    public class AppIdentityDbContext : IdentityDbContext<AppUser>
    {
        public AppIdentityDbContext(DbContextOptions<AppIdentityDbContext> options) : base(options)
        {
        }
    }
}
Remember, in application you can have only one DbContext file, so in the solution if there is any other DbContext file, then you must delete that file, otherwise the "entity framework code generation utility" will not be able to figure out which one to use.
Configure Identity service in Startup file
In startup.cs service method we need register following two services.
services.AddDbContext<AppIdentityDbContext>(options => options.UseSqlServer(DbConnection.ConnectionString2));
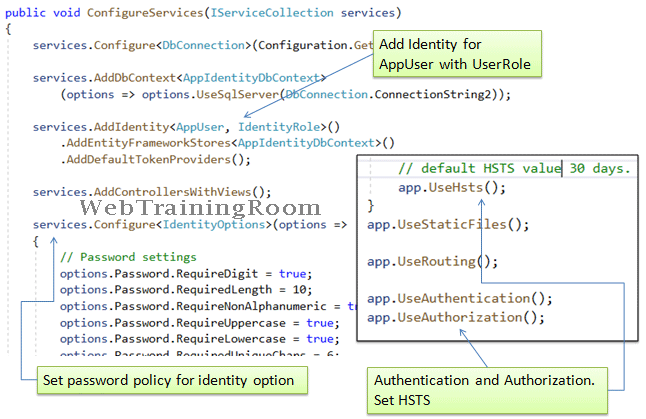
services.AddIdentity<AppUser, IdentityRole>().AddEntityFrameworkStores<AppIdentityDbContext>().AddDefaultTokenProviders();
And before that configuration, you need to configure all your database related credentials in appsettings.json file.
Here is how my appsettings.json file look like with database info.
{
  "DbConnectionConfig": {
    "DatabaseName": "AuthDB",
    "UserName": "mySA",
    "Password": "mypassword123",
    "ServerName": "Server1\\SQLEXPRESS"
  }
}
Here I am not including the code of how i created and additional DbConnection class to read from appsettings.json file using config service, just to keep this post short and focused on Identity service.
Server=myserver1\\SQLEXPRESS;Database=AuthDB;Trusted_Connection=True;MultipleActiveResultSets=true;
I have kept trusted connection true Trusted_Connection=True so this will use windows authentication, don't need to provide any
sql username and password.
Here is the complete code for Startup.cs file.
namespace WTRIdentityCore
{
public class Startup
{
public IConfiguration Configuration { get; }
public static string DbConnectionString { get; set; }
public Startup(IConfiguration configuration)
{
Configuration = configuration;
}
public void ConfigureServices(IServiceCollection services)
{
services.Configure<DbConnection>(Configuration.GetSection("DbConnectionConfig"));
services.AddDbContext<AppIdentityDbContext>(options => options.UseSqlServer(DbConnection.ConnectionString2));
services.AddIdentity<AppUser, IdentityRole>().AddEntityFrameworkStores<AppIdentityDbContext>().AddDefaultTokenProviders();
services.AddControllersWithViews(); }
public void Configure(IApplicationBuilder app, IWebHostEnvironment env)
{
if (env.IsDevelopment())
{
app.UseDeveloperExceptionPage();
}
else
{
app.UseExceptionHandler("/Home/Error");
// default HSTS 30 days.
app.UseHsts();
}
app.UseStaticFiles();
app.UseRouting();

app.UseAuthentication();
app.UseAuthorization();

            app.UseEndpoints(endpoints =>
            {
                endpoints.MapControllerRoute(
                    name: "default",
                    pattern: "{controller=Home}/{action=Index}/{id?}");
            });
        }
    }
}
We also could have configured password options like length, Alphanumeric, uppercase, lowercase, type of character we want to accept in password etc.
services.Configure<IdentityOptions>(options =>
    {
        // Password settings
        options.Password.RequireDigit = true;
        options.Password.RequiredLength = 10;
        options.Password.RequireNonAlphanumeric = true;
        options.Password.RequireUppercase = true;
        options.Password.RequireLowercase = true;
        options.Password.RequiredUniqueChars = 6;
        options.SignIn.RequireConfirmedEmail = true;
        options.User.RequireUniqueEmail = true;
        options.User.AllowedUserNameCharacters = "abcdefghijklmnopqrstuvwxyzABCDEFGHIJKLMNOPQRSTUVWXYZ0123456789@.";
    });
Identity service tables in database
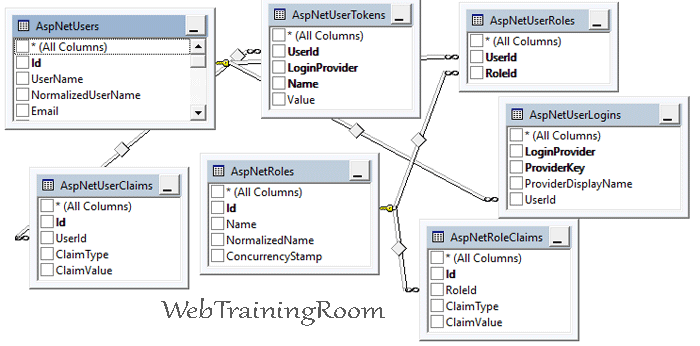
Now at this point we have set the identity options in our asp.net core application, now we have to create database tables using entity framework migration command, in this post i will skip the details of how to work with ef migration command from package manager console.

Now open your nuget package manager from tools option, then execute the following command. The command will add a "Migrations" folder with some scripts in your solution (this part is not necessary).
dotnet ef migrations add InitialCreate
Or, simply run the following command to cerate database tables as shown in above picture.
dotnet ef database update
Controller Action using Indentity Service
Now we design controller action, when the form is submitted how to write action method using identity service, so we can check authentication or create a new user.
In the controller I will keep only two post method, one for creating new user and other one for log in, this two methods will be good enough to make you understand how identity service works (removing all other addition get action code, assuming you are already familiar with that part).
In all identity methods we either pass IdentityUser object or receive an object of same type. the core IdentityUser object as some built-in properties, but we still can create additional property as per our requirement. Here is an example of how we can create an IdentityUser object.
public class AppUser:IdentityUser
{
    [PersonalData]
    public DateTime DOB { get; set; }

    [PersonalData]
    public string Mobile { get; set; }

    [PersonalData]
    public string FullName { get; set; }
}
Note, when you create any additional properties in IdentityUser object, make sure you create those same columns in database table, either using database update command from visual studio or in database manually.
First we have to create new instance of UserManager and SignInManager using controller dependency injection, also make sure you have added following assembly references.
using Microsoft.AspNetCore.Authorization;
using Microsoft.AspNetCore.Identity;
using Microsoft.AspNetCore.Mvc;
using Microsoft.Extensions.Logging;
using System.Threading.Tasks;
using WTRIdentityCore.Models;

public class acctController : Controller
{
    private readonly ILogger<acctController> _logger;
    private UserManager<AppUser> userManager;
    private SignInManager<AppUser> signInManager;

    public acctController(ILogger<acctController> logger,
        UserManager<AppUser> userMgr,
        SignInManager<AppUser> signinMgr)
    {
        _logger = logger;
        userManager = userMgr;
        signInManager = signinMgr;
    }
}
Again, assuming you know how to design model with field validation attributes, so here I am not including those model codes.
Here is how the login post method will look like!
[HttpPost]
[AllowAnonymous]
[ValidateAntiForgeryToken]
public async Task<IActionResult> login(LoginModel login)
{
	AppUser appUser = await userManager.FindByEmailAsync(login.Email);
	if (appUser != null)
	{
		await signInManager.SignOutAsync();
		Microsoft.AspNetCore.Identity.SignInResult result = await signInManager.PasswordSignInAsync(appUser, login.Password, false, false);
		if (result.Succeeded)
			return Redirect(login.ReturnUrl ?? "/controlpanel");
	}

	// if logic reach here, then validation failed
	return await Task.Run(() => View());
}
Notice, in above method how to call signInManager.PasswordSignInAsync(appUser, login.Password, false, false)
for signing in! the method returns result object, which has a Boolean property called “Succeeded”, indicates if user login was successful.
Here is another example of adding new user when registration form is submitted.
[HttpPost]
[AllowAnonymous]
[ValidateAntiForgeryToken]
public async Task<IActionResult> register(RegistrationModel model)
{
	AppUser user = new AppUser();
	user.Email = model.Email;
	user.PhoneNumber = model.PhoneNumber;
	user.FullName = model.Name;
	user.Mobile = model.Mobile;

	var result = await userManager.CreateAsync(user, model.Password);

	if (result.Succeeded)
	{
		_logger.LogInformation("New user created.");

		await signInManager.SignInAsync(user, isPersistent: false);

        return RedirectToAction("success");
	}
	// if reach here, then something wrong.
	return await Task.Run(() => View(model));
}
Notice, how we call CreateAsync method and pass IdentityUser object in userManager.CreateAsync(user, model.Password), the method returns a result object which has "Succeeded" property, indicates whether a new user was created successfully.
You may be interested to read following posts

