SignalR Live Chat Example using Asp.Net Core
In this SignalR tutorial you will learn how to develop basic chat application using Asp.net Core framework.

Asp.net SingnalR is an API introduced with Asp.net framework (was introduced few years ago) that allow us to push data on client browser without waiting for request, we can display real-time data update like chat or broadcasting application.
In this SignalR example you will learn how to broadcast messages like open chat, then you learn how to create group specific browser based chat application.
Framework: SignalR Core Asp.net Core 3.1 Example
Asp.net SignalR example using .Net Core
Open your visual studio and create asp.net core razor page project, You can choose MVC project also.
First, we need to install all required packages from Nuget package manager.
install Microsoft.AspNetCore.SignalR
Microsoft.AspNetCore.SignalR.Client
Microsoft.AspNetCore.SignalR.Core
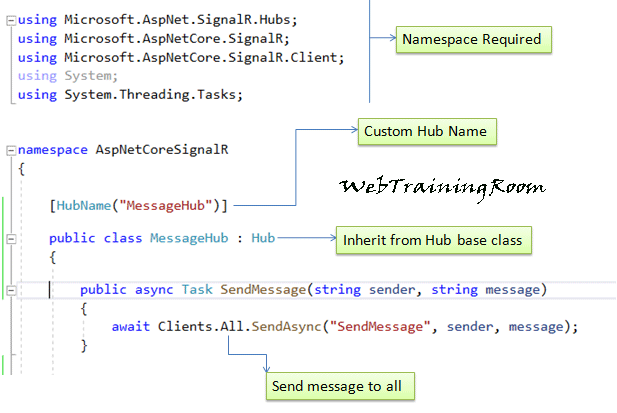
Second, create a Hub class with any name you want, like in example below MessageHub,
the class must inherit from Hub class.

using System;
using Microsoft.AspNet.SignalR.Hubs;
using Microsoft.AspNetCore.SignalR;
using Microsoft.AspNetCore.SignalR.Client;
using System.Threading.Tasks;
[HubName("MessageHub")]
public class MessageHub : Hub
{
  public async Task SendMessage(string sender, string message)
    {
        await Clients.All.SendAsync("SendMessage", sender, message);
    }
}
Remember, we cannot have function overloading in hub function definition, so each function name needs to be unique, later I will explain this part with some example.
In startup.cs file you need to do following changes to register signalr middleware in http pipeline.
In ConfigureServices method, add the SignalR in service pipeline.
public void ConfigureServices(IServiceCollection services)
{
     services.AddSignalR();
}
Now configure the endpoint of newly created hub MessageHub class.
public void Configure(IApplicationBuilder app, IWebHostEnvironment env)
{
    app.UseEndpoints(endpoints =>
            {
                endpoints.MapRazorPages();
                endpoints.MapHub<MessageHub>($"/{nameof(MessageHub)}");
            });
}
SignalR Client implementation
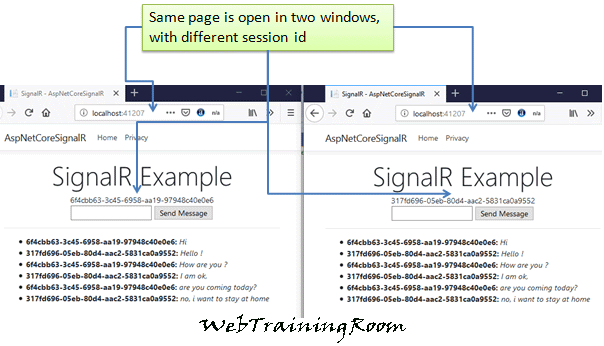
In razor view we create a simple form to post signalr message for all, this will be type of broadcasting to all users whoever accessing the same client.

Note, here i have used session id as differentiator, to indentify each post with a unique id, in real-time scenario you probably can capture the username as differentiator.
Now I create a simple html form in razor page.
<div class="signalr-demo">
    <div id="senderUId">@HttpContext.Session.Id</div>
    <form id="messageform">
        <input type="text" id="messagebox" />
        <input type="button" value="Send Message" id="btnSend" />
    </form>
    <hr />
    <ul id="messageList" style="text-align:left;"></ul>
</div>
Now, Add the signalR script reference in chtml file, this needs to be done before the form design part.
<script src="~/lib/signalr/signalr.js"></script>
Create signalR connection object instance in javascript code.
<script>
const connection = new signalR.HubConnectionBuilder()
.withUrl("/MessageHub")
.build();
connection.start()
.catch(err => alert(err.toString()));
</script>
Now we invoke the signalr method "SendMessage" with parameter values. and display the result on page.
<script>
$(document).ready(function () {
    $("#btnSend").click(function (e) {
        let message = $('#messagebox').val();
        let sender = $('#senderUId').text();
        $('#messagebox').val('');
        connection.invoke('SendMessage', sender, message);
        e.preventDefault();
    });
});
function appendLine(uid, message) {
        let nameElement = document.createElement('strong');
        nameElement.innerText = `${uid}:`;
        let msgElement = document.createElement('em');
        msgElement.innerText = ` ${message}`;
        let li = document.createElement('li');
        li.appendChild(nameElement);
        li.appendChild(msgElement);
        $('#messageList').append(li);
};
</script>
Thus whenever you post any message, that will appear to all the clients (whoever accessing the same url).
So far, you have seen how to write a real-time application using SignalR API in Asp.net core framework.
Now you learn some more functionality, like when a new user joins the conversation or leaves the conversation, how notification sent to the all the clients browser.
So, in hub class MessageHub we override two methods OnConnectedAsync and OnDisconnectedAsync.
thorough these two methods we send notifications to all clients browsers
[HubName("MessageHub")]
public class MessageHub : Hub
{
    public override async Task OnConnectedAsync()
    {
        await Clients.All.SendAsync("UserConnected", Context.ConnectionId);
        await base.OnConnectedAsync();
    }

    public override async Task OnDisconnectedAsync(Exception ex)
    {
        await Clients.All.SendAsync("UserDisconnected", Context.ConnectionId);
        await base.OnDisconnectedAsync(ex);
    }
}
As you can see we have defined two function name UserConnected and UserDisconnected, so the same function needs to be implemented in our JavaScript code in razor page.
connection.on('UserConnected', (ConnectionId) => { let _message = " Connected " + ConnectionId;
let sender = $('#senderUId').text();
appendLine(sender, _message);
});
connection.on('UserDisconnected', (ConnectionId) => {
    let _message = " Disconnected " + ConnectionId;
    let sender = $('#senderUId').text();
    appendLine(sender, _message);
});
Please use the same signalR connection object instance created using HubConnectionBuilder in above javascript code.
You may be interested to know how to send message to a private group

