Claims based authentication in Asp.net Core
Claims based authentication is very similar to role-based authentication in general (apart from the fact how its implemented in asp.net core context), now let’s understand what is claim in asp.net core !
In this post, i will try to explain following points
- What is claim? Claim object structure and relations
- How to implement claim details for an user? Add or remove claim.
- Difference between claim and role based authorization
- Claim with role and claim (without role) with user object
- Database object structure for claim and role

Claim is the class under System.Security.Claims namespace, which has a IDictionary object in it,
we can create claim with type and value string type, string value,
just like how we create any other dictionary object, but apart from type and value,
Claim has few other constructors overload, we can cerate like Claim(ClaimTypes.Country, string type, string value),
Here is an example of how to create List<Claim>.
using System.Security.Claims;
var claims = new List<Claim> {
        new Claim(ClaimTypes.Name, "FirstName", ClaimValueTypes.String, Issuer),
        new Claim(ClaimTypes.Surname, "Chakraborty", ClaimValueTypes.String, Issuer),
        new Claim(ClaimTypes.Country, "India", ClaimValueTypes.String, Issuer),
        new Claim("FavColor", "Dark Red", ClaimValueTypes.String)
    };
Now we can create a user indentity with above claims and principal object with Identity.
using System.Security.Claims;
var userIdentity = new ClaimsIdentity(claims, "IdCard");
var userPrincipal = new ClaimsPrincipal(userIdentity);
Add Claims with Identity Service in .net Core
Here we learn how to set claims for any user in database and how to use identity framework methods to add new claim or remove from claims, before we start looking at methods we need understand the implementation and database tables for claims.
In startup class, make sure you have registered following two authentication and authorization service.
app.UseAuthentication();
app.UseAuthorization()
In startup configureServices ConfigureServices(IServiceCollection services) method add policy with claims like example below.
    services.AddAuthorization(options =>
    {
        options.AddPolicy("EmployeeOnly", policy => policy.RequireClaim("EmployeeId"));
    });
Finally, at action result we can add Authorize attribute with policy details.
[Authorize(Policy = "Employee")]
public IActionResult AccountBalance()
{
    return View();
}
Claim based authorization is subset of role-based authorization, for any role there can be multiple claims.
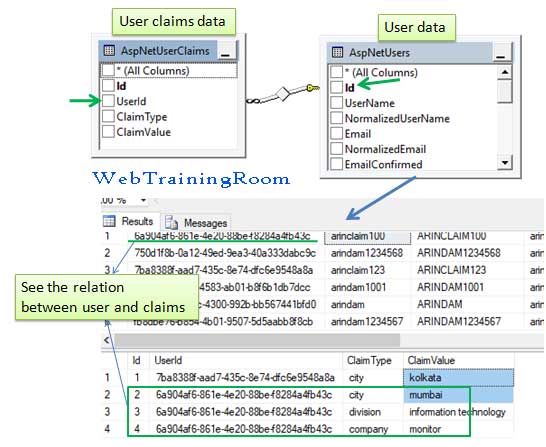
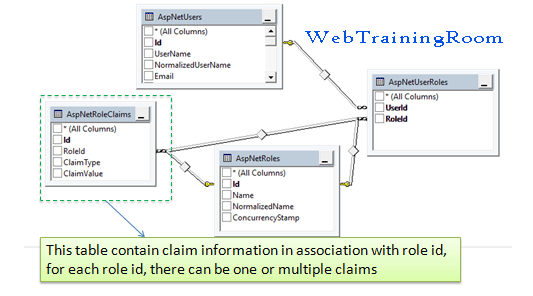
Claim can be set directly for any user in "AspNetUserClaims" table or in association with role in "AspNetRoleClaims" table.
To set claim for any user we use "AspNetUserClaims" table, there are two methods one for setting single claim and another one for setting multiple claims.
First make sure your identity user object is rightly populated, then call the "AddClaimAsync" method of user manager
Claim _userClaim = new Claim("city", "kolkata");
_userManager.AddClaimAsync(identityUser, _userClaim);
We also can set multiple claims with one call using "AddClaimsAsync" method like example below.
List<Claim> _userClaims = new List<Claim>();
_userClaims.Add(new Claim("city", "mumbai"));
_userClaims.Add(new Claim("division", "information technology"));
_userClaims.Add(new Claim("company", "monitor"));
_userManager.AddClaimsAsync(identityUser, _userClaims);
After executing the above methods you can check "AspNetUserClaims" table in database, you will see all claims value has been inserted in that table.

There is another way we can set claim for each user role, as you can see claim also can be set for each user role instead of each user individually.
To create, manage roles and claims associated with it, use RoleManager class instance with IdentityRole, below is the example of how you can create new instance of RoleManager using constructor dependency injection.
private RoleManager<IdentityRole> _roleManager;

public userwithroleModel(UserManager<AppUser> userMgr,
SignInManager<AppUser> signinMgr,
RoleManager<IdentityRole> roleManager)
{

	_userManager = userMgr;
	_signInManager = signinMgr;
	_roleManager = roleManager;
}
When you create any new role or add claims to that role, data goes in AspNetRoles and AspNetRoleClaims tables, using RoleManager class instance we can manage all role related functionalities.
AppRole role = new AppRole();
role.Name = "Admin";
_roleManager.CreateAsync(role);


Claim _userClaim = new Claim("dbaccess", "yes");
_roleManager.AddClaimAsync(role, _userClaim);
However, when you want to assign a role or claim to user, use UserManager object only. User specific role and claim goes to AspNetUserRoles, AspNetUserClaims tables.
Claim based authorization check
Here we check authorization for any particular claim for an user, you probably can use the same logic for authentication, conceptually, claim should be used for checking authorization only, not for authentication, however there is no hard rule, all depends on what you want to achieve on which scenario.
So far we have learned about all attributes of claim object, now we see how we can check any claim in any user claim collection.
for example we want to check if user has this claim Claim _userClaim = new Claim("city", "mumbai");
var user = _userManager.FindByEmailAsync("some-email@domain.com");
AppUser appUser = user.Result;

Claim _userClaim = new Claim("city", "mumbai");

Task<IList<Claim>> claimsResult=  _userManager.GetClaimsAsync(appUser);
IList<Claim> claims = claimsResult.Result;


bool hasClaim = false;
if(claims!=null)
{
	foreach (Claim c in claims)
	{
		if ((c.Value == _userClaim.Value) &&
			(c.Type == _userClaim.Type))
		{
			hasClaim = true;
		}
	}
}


if (hasClaim)
{
	// claim found for current user
}
else {
	// claim not found
}
In above code we find all claims for any user using _userManager.GetClaimsAsync(appUser) method,
then comparing each claim with required-claim I want user to have in collection.
Now this piece of code you can write in any util class as static function or can create a attribute class, which will be more convenient way to checking claim for any function.

