Asp.net Web Form Tutorial
Any form we see on web pages, are the web form, html web form design almost remain same throughout all web application in any programming language.
Here you learn how to design a form in asp.net that will allow user to submit information to server.
Using ASP.NET Web Form you can create dynamic websites very easily; it provides you everything to build a powerful UI-driven site rapidly.
Here you learn how to create a asp.net web form and receive user input and submit the form.
Remember when you create a aspx page in asp.net, the page itself a form, and at submit button click event you can capture all user input in code behind (aspx.cs )
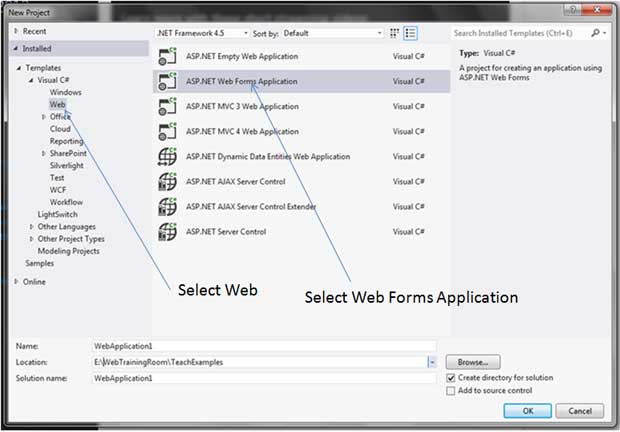
Step 1: Create a Project of type "Asp.Net Web Forms Application"
Now you once you click "Ok", a new web form project will be created, by default there will be some pages like home, about, contact etc.
But still we add another new page so you learn how to add a new page / form, Remember in asp.net web forms application whenever you add a new page, that’s a form, so don't get confused by "form" and "page" terminology, both are actually same though technically they have different characteristic.
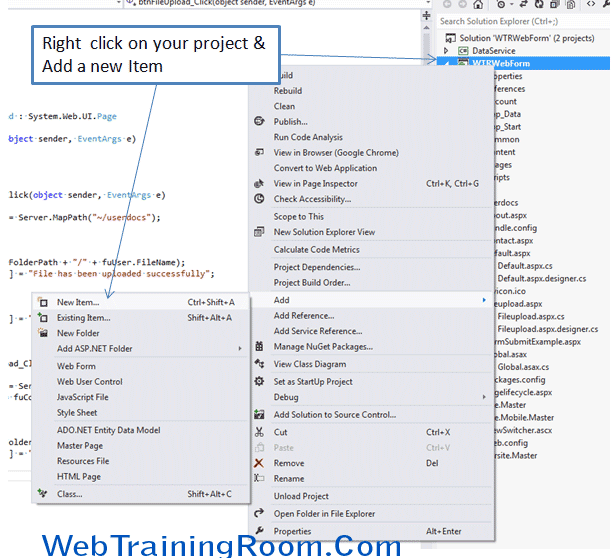
Add Web Form in Asp.net Project
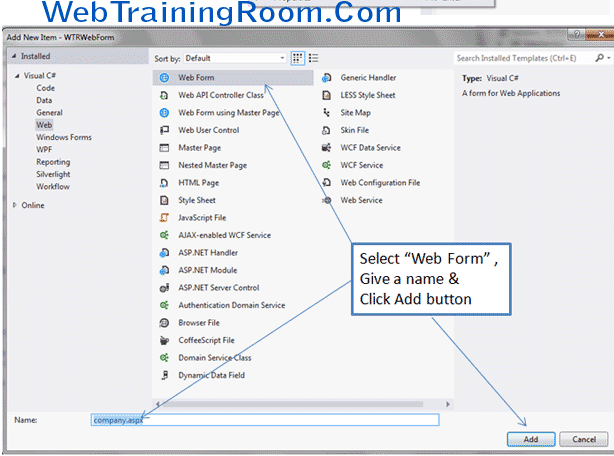
Step 2: Create a new Web Form / Page

Give the web page a name

A new web form page is added in your project with following code
<%@ Page Language="C#" AutoEventWireup="true" CodeBehind="company.aspx.cs" Inherits="WTRWebForm.company" %>
<!DOCTYPE html>
<html xmlns="http://www.w3.org/1999/xhtml">
<head runat="server">
<title>Web Form </title>
</head>
<body>
<form id="form1" runat="server">
<div> </div>
</form>
</body>
</html>
Notice, one form tag has been added in your webpage.
Now probably you have a master page in your project, so you need to add the master page reference in this page also.
Remember, if you want to add master page reference in this page, you need to remove the form tag from this page, because master page has a form tag, and in web page you can have only one form tag
To add master page in your web form page, simply go to page directive and set the MasterPageFile name. by default there is one masterpage called "Site.Master" is created with project. but you can add a new master page as per your need.
<%@ Page Language="C#" AutoEventWireup="true" CodeBehind="Fileupload.aspx.cs"
MasterPageFile="~/Site.Master" Inherits="WTRWebForm.Fileupload" %>
Notice to set any master page in your web page, you need to set the "MasterPageFile" property value, like in above example we have set MasterPageFile="~/Site.Master"
After adding master page reference you need to remove all other html code, now everything should come under following asp:Content tag
<asp:Content runat="server" ID="FeaturedContent" ContentPlaceHolderID="FeaturedContent">

// all page content goes here.
</asp:Content>
All page specific content will go inside the asp:Content tag
Adding master page in all your webpage will make the application standard and consistent, also if you want to make changes in any common area like header, footer , left navigation etc. it will very easy to change in just one place and the change will get reflected in all over application.
Asp.Net Code Behind Example
So far you have seen how to create a simple web form project and adding a master page to your web form, though when you create any asp.net project by default one master page (“Site.Master”) is added to your web form.
Now you learn how to work with code behind file, in simple word when you click on any button on web page how data gets processed to database through code behind .cs file, every web page has a code behind file, so let’s understand with example
First we design a simple form with three controls a label, textbox and a button, we want when someone subscribe their email id data to be captured in database and a success message to be displayed on screen.
<%@ Page Language="C#" AutoEventWireup="true" CodeBehind="subscription.aspx.cs" Inherits="AspX.subscription" MasterPageFile="~/Site.Master" %>
<asp:Content ID="BodyContent" ContentPlaceHolderID="MainContent" runat="server">
<div style="padding:100px;margin:100px;">
<div style="padding:10px;">
<asp:Label runat="server" ID="labMessage"></asp:Label>
</div>
<asp:TextBox ID="txtEmail" runat="server"></asp:TextBox>
<asp:Button  runat="server" text="Subscribe" ID="btnSubscribe" OnClick="btnSubscribe_Click"/>
</div>
</asp:Content>
Notice: All controls have a runat="server" attribute and an ID, so we can access the control in
code behind file.
Also notice that code behind file name has been specified in Page directive CodeBehind="subscription.aspx.cs"
This is how our code behind file will look like, all code behind class are inherited from "System.Web.UI.Page" class.
using System;
namespace AspX
{
    public partial class subscription : System.Web.UI.Page
    {
        protected void Page_Load(object sender, EventArgs e)
        {
        }
        protected void btnSubscribe_Click(object sender, EventArgs e)
        {
            labMessage.Text = string.Format("{0} has been successfully Subscribed",txtEmail.Text);
        }
    }
}
Notice the code behind class name "subscription" has been inherited from Page Class
public partial class subscription : System.Web.UI.Page
To understand better how button click works you should read Page IsPostBack and Asp.net Page Lifecycle


